

테스트 환경
| 서버환경 | 서버종류 | OS종류 | OS버전 |
|---|---|---|---|
| OCI | VM(x86) | Oracle Linux(redhat계열) | 8.9 |
들어가며
Python 프로그램을 작성할경우 라이브러리간 Dependency가 복잡하게 연결되어 있어 관리하기 힘듦니다. 그래서 애플리케이션별로 환경을 분리하여 운영하는것이 추후 변경관리할때 좋습니다.
개발환경을 구분하기 위하여 Python환경 관리자인 anaconda와 Miniconda를 고려해볼수 있습니다. anaconda는 데이터과학 및 데이터 분석을 위한 패키지들을 제공하며 설치파일 크기가 상당히 큽니다. 내가 개발하려는 환경을 경량하게 관리하고자 할경우 miniconda를 이용해서 관리할수 있습니다. 그외 virtualevn, poetry, pyenv등의 도구들도 있습니다.
본 내용에서는 miniconda로 설치환경을 구성하고 jupyter에서 miniconda로 구성된 환경을 사용하도록 연결하는 절차에 대해서 알아보도록 하겠습니다.
oracle OS유저가 있다고 가정하고 oracle OS유저영역에서 구성하도록 하겠습니다.설치하도록 하겠습니다.
Miniconda 설치 및 가상환경 추가
miniconda 설치 파일(약 140MB)을 다운로드 받고 설치작업을 수행합니다.
## miniconda 설치
cd /home/oracle
wget https://repo.anaconda.com/miniconda/Miniconda3-latest-Linux-x86_64.sh
bash Miniconda3-latest-Linux-x86_64.sh
설치 화면입니다. /home/oracle/miniconda3 밑에 폴더에 python가상환경이 생성됩니다.
oracle$> bash Miniconda3-latest-Linux-x86_64.sh
Please, press ENTER to continue
>>> <enter>
Do you accept the license terms? [yes|no]
>>> yes
[/home/oracle/miniconda3] >>> <enter>
You can undo this by running `conda init --reverse $SHELL`? [yes|no]
[no] >>> <enter>
conda 초기화 작업을 수행합니다. 초기화 작업이후에 shell을 재 접속해야합니다.
/home/oracle/miniconda3/bin/conda init
exit; (shell접속을 새로 해야됨)
conda 초기화 화면입니다.
oracle$> /home/oracle/miniconda3/bin/conda init
no change     /home/oracle/miniconda3/condabin/conda
no change     /home/oracle/miniconda3/bin/conda
no change     /home/oracle/miniconda3/bin/conda-env
no change     /home/oracle/miniconda3/bin/activate
no change     /home/oracle/miniconda3/bin/deactivate
no change     /home/oracle/miniconda3/etc/profile.d/conda.sh
no change     /home/oracle/miniconda3/etc/fish/conf.d/conda.fish
no change     /home/oracle/miniconda3/shell/condabin/Conda.psm1
no change     /home/oracle/miniconda3/shell/condabin/conda-hook.ps1
no change     /home/oracle/miniconda3/lib/python3.12/site-packages/xontrib/conda.xsh
no change     /home/oracle/miniconda3/etc/profile.d/conda.csh
modified      /home/oracle/.bashrc
==> For changes to take effect, close and re-open your current shell. <==
shell을 다시 접속하면 아래와 같이 보입니다. 쉘 프롬프트앞에 (base)가 추가된것을 확인할수 있습니다.
sudo su – oracle
(base) oracle>$
miniconda를 이용하여 python버전이 다른 두개의 환경을 구성하도록 하겠습니다.
app1의 가상환경은 python 3.12를 사용합니다.
## app2 가상환경 생성
conda create -n app1 python=3.12
#Proceed ([y]/n)? y
conda activate app1
가상환경을 사용하기 위해서는 activate 작업이 필요합니다 activate작업을 하면 쉘 프롬프트에 (app1)이 추가됩니다. pip3도구를 이용하여 python 3.12버전에 맞는 관련 라이브러리를 설치해서 사용하면 됩니다.
(base) oracle$> conda activate app1
(app1) oracle$>
app2의 가상환경은 python 3.6를 사용합니다.
## app2 가상환경 생성
conda create -n app2 python=3.6
#Proceed ([y]/n)? y
conda activate app2
지금까지 miniconda를 설치하고, app1, app2의 가상환경을 구성했습니다.
Jypyterlab 설치 및 Kernel 추가
앞서 만든 app1, app2를 Jypyter에서 사용할수 있도록 kernel에 등록하는 절차에 대해서 알아보겠습니다.
우선 Jypyter를 설치합니다. base 환경에서 Juputer를 설치합니다.
## Jypyter설치(oracle유저)
conda activate base
conda install -c conda-forge jupyterlab  ipywidgets
#Proceed ([y]/n)? Y
app1 가상환경을 kernel로 등록합니다.
## 커널 설정 (oracle유저)
conda activate app1
conda install -c conda-forge ipykernel ipywidgets
#Proceed ([y]/n)? Y
jupyter kernelspec remove python3
#Remove 1 kernel specs [y/N]: y
python -m ipykernel install --user --name app1
kernel 등록 화면입니다. 각 가상환경별로 ptyhon3 환경이 존재합니다. 여러개의 가상환경을 사용할때 python3이 충돌될수 있어, 미리 삭제합니다.
(app1) oracle>$ jupyter kernelspec remove python3
Kernel specs to remove:
  python3               /home/oracle/miniconda3/envs/app1/share/jupyter/kernels/python3
Remove 1 kernel specs [y/N]: y
Removed /home/oracle/miniconda3/envs/app1/share/jupyter/kernels/python3
(app1) oracle>$ python -m ipykernel install --user --name app1
0.00s - Debugger warning: It seems that frozen modules are being used, which may
0.00s - make the debugger miss breakpoints. Please pass -Xfrozen_modules=off
0.00s - to python to disable frozen modules.
0.00s - Note: Debugging will proceed. Set PYDEVD_DISABLE_FILE_VALIDATION=1 to disable this validation.
Installed kernelspec app1 in /home/oracle/.local/share/jupyter/kernels/app1
(app1) oracle>$
app2 가상환경을 kernel로 등록합니다.
## 커널 설정 (oracle유저)
conda activate app2
conda install -c conda-forge ipykernel ipywidgets
#Proceed ([y]/n)? Y
jupyter kernelspec remove python3
#Remove 1 kernel specs [y/N]: y
python -m ipykernel install --user --name app2
Jupyter를 실행합니다. ip와 port를 지정할수 있습니다. ip를 사용하지 않으면 localhost로만 접속이 되므로 외부 서비스로 제공하기 위해서는 0.0.0.0으로 설정하는것이 좋습니다.
conda activate base
jupyter lab --ip 0.0.0.0 --port 9999
Jupyter 실행화면입니다.
(base) oracle>$ jupyter lab --ip 0.0.0.0 --port 9999
[I 2024-06-05 07:53:51.896 ServerApp] jupyter_lsp | extension was successfully linked.
[I 2024-06-05 07:53:51.899 ServerApp] jupyter_server_terminals | extension was successfully linked.
[I 2024-06-05 07:53:51.903 ServerApp] jupyterlab | extension was successfully linked.
[I 2024-06-05 07:53:51.904 ServerApp] Writing Jupyter server cookie secret to /home/oracle/.local/share/jupyter/runtime/jupyter_cookie_secret
[I 2024-06-05 07:53:52.079 ServerApp] notebook_shim | extension was successfully linked.
[I 2024-06-05 07:53:52.091 ServerApp] notebook_shim | extension was successfully loaded.
[I 2024-06-05 07:53:52.093 ServerApp] jupyter_lsp | extension was successfully loaded.
[I 2024-06-05 07:53:52.094 ServerApp] jupyter_server_terminals | extension was successfully loaded.
[I 2024-06-05 07:53:52.095 LabApp] JupyterLab extension loaded from /home/oracle/miniconda3/lib/python3.12/site-packages/jupyterlab
[I 2024-06-05 07:53:52.095 LabApp] JupyterLab application directory is /home/oracle/miniconda3/share/jupyter/lab
[I 2024-06-05 07:53:52.095 LabApp] Extension Manager is 'pypi'.
[I 2024-06-05 07:53:52.107 ServerApp] jupyterlab | extension was successfully loaded.
[I 2024-06-05 07:53:52.108 ServerApp] Serving notebooks from local directory: /home/oracle
[I 2024-06-05 07:53:52.108 ServerApp] Jupyter Server 2.14.1 is running at:
[I 2024-06-05 07:53:52.108 ServerApp] http://oml4py-client:9999/lab?token=a9a31e7cb89fc41dc1e760409fdcdcebe469b8d8edc85915
[I 2024-06-05 07:53:52.108 ServerApp]     http://127.0.0.1:9999/lab?token=a9a31e7cb89fc41dc1e760409fdcdcebe469b8d8edc85915
[I 2024-06-05 07:53:52.108 ServerApp] Use Control-C to stop this server and shut down all kernels (twice to skip confirmation).
[C 2024-06-05 07:53:52.440 ServerApp]

    To access the server, open this file in a browser:
        file:///home/oracle/.local/share/jupyter/runtime/jpserver-17672-open.html
    Or copy and paste one of these URLs:
        http://<hostname>:9999/lab?token=a9a31e7cb89fc41dc1e760409fdcdcebe469b8d8edc85915
        http://127.0.0.1:9999/lab?token=a9a31e7cb89fc41dc1e760409fdcdcebe469b8d8edc85915
[I 2024-06-05 07:53:52.462 ServerApp] Skipped non-installed server(s): bash-language-server, dockerfile-language-server-nodejs, javascript-typescript-langserver, jedi-language-server, julia-language-server, pyright, python-language-server, python-lsp-server, r-languageserver, sql-language-server, texlab, typescript-language-server, unified-language-server, vscode-css-languageserver-bin, vscode-html-languageserver-bin, vscode-json-languageserver-bin, yaml-language-server
(필요시) Jupyter서비스 포트를 OS방화벽에서 오픈합니다.
## 방화벽(필요시 - opc유저로 수행)
sudo firewall-cmd --permanent --zone=public --add-port=9999/tcp
sudo firewall-cmd --reload
Jupyter notebook 웹 페이지로 접속합니다. jupyter를 실행하면 token정보가 자동 생성되며, 별도 인증없이 token정보를 이용해서 접속됩니다.
http://[server ip]:9999/lab?token=a9a31e7cb89fc41dc1e760409fdcdcebe469b8d8edc85915
Jupyter에 접속하면 app1, appp2 가상환경이 등록된것을 확인할수 있습니다.
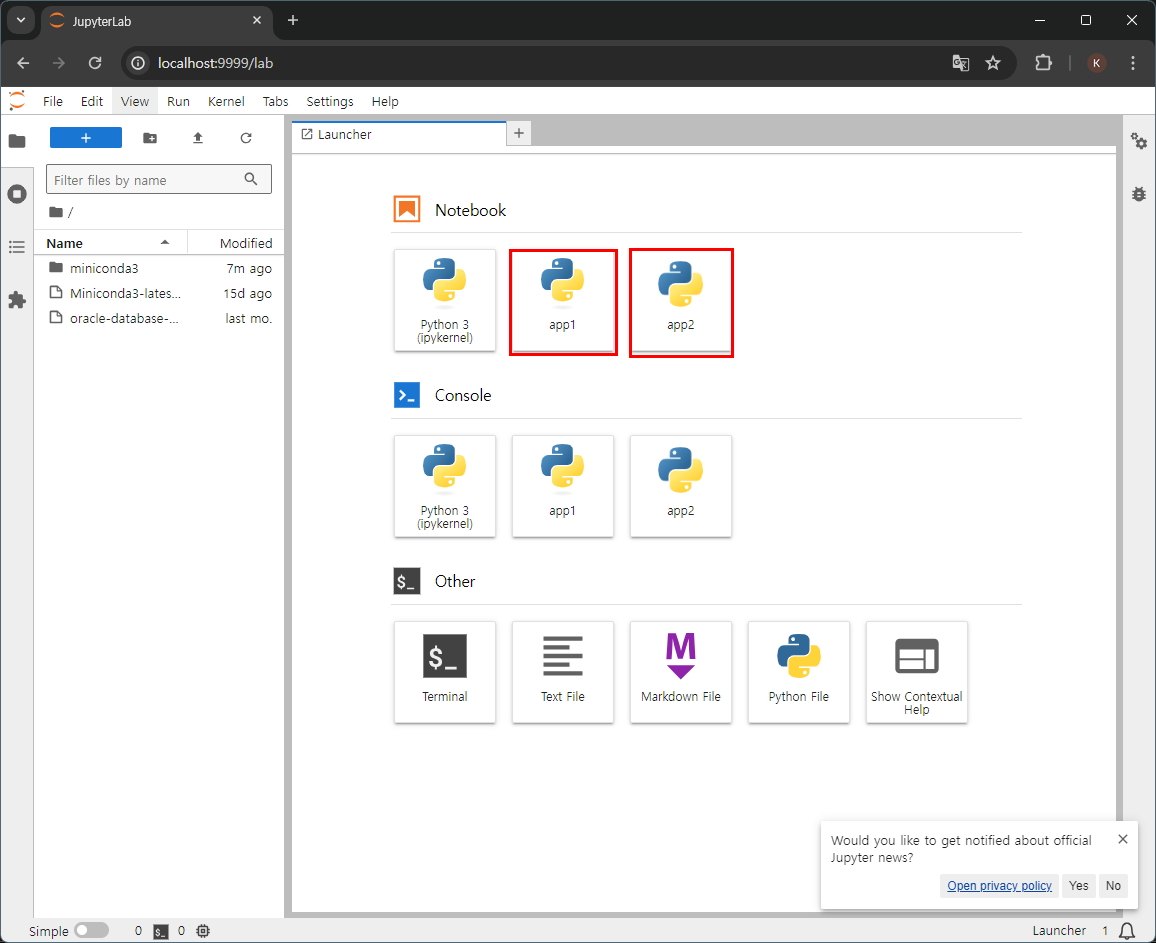
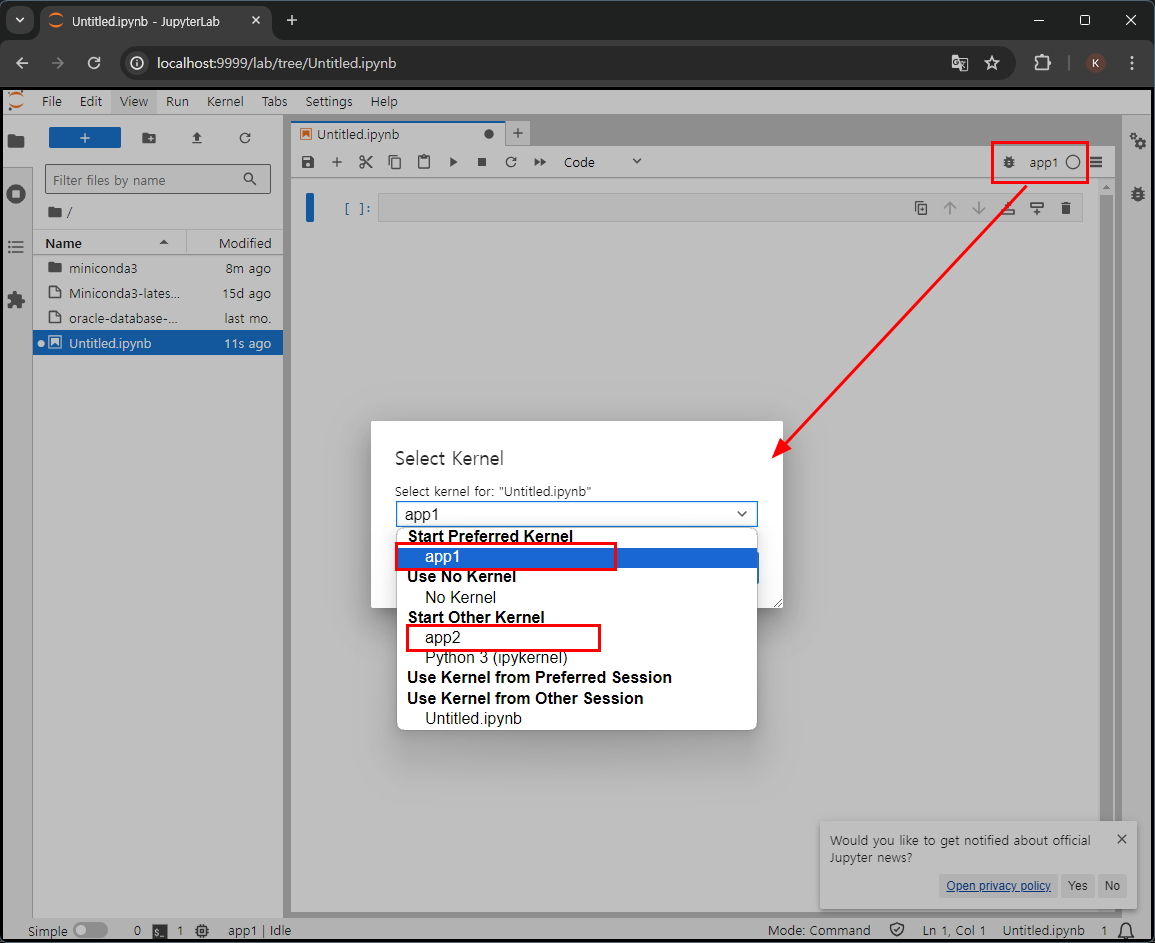
notebook을 임의적으로 만들고 오른쪽 상단에서 kernel값을 변경할수 있습니다.
마무리
지금까지 miniconda를 설치하고 app1,app2의 가상 python환경을 생성하였습니다. 생성된 python가상환경을 jupyter에서 사용할수 있도록 kernel로 등록했습니다.
앞서 설명했듯이 python라이브러리 관리를 위해서 다양한 방식으로 관리할수 있습니다. 저처럼 처음 python을 접하신분들에게 유용한 tip이 되었으면 좋겠습니다.
댓글남기기